How to host a session
Local server
The multi-user add-on relies on a Client-Server architecture. The server is the heart of the collaborative session. It is what allows user’s blender instances to communicate with each other. In simple terms, Hosting a session means run a local server and connect the local client to it. When we say local server we mean a server which is accessible from the LAN (Local Area Network) without requiring an internet connection.
When the hosting process starts, the multi-user addon will launch a local server instance. In the Hosting panel configure your server according to:
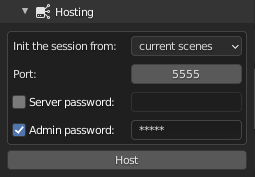
Hosting panel
- Init the session from: the session initialisation method.
- current scenes: start with the data loaded in the current blend file.
- an empty scene: clear the blend file’s data and start over.
- Port: port on which the server is listening.
- Server password: (optional) the server password.
- Admin password: (optional) the session administration password.
Once everything is set up, you can hit the Host button to launch the session!
This will do two things:
- Start a local server
- Connect you to it as an admin
Danger
By starting from an empty scene, all of the blend data will be removed! Be sure to save your existing work before launching the session.
Online server
However, there are times when you will need to host a session over the internet. In this case, we strongly recommend that you read the Hosting on Internet tutorial.
During an online session, various actions are available to you, go to How to manage a session section to learn more about them.